项目2:联系人列表

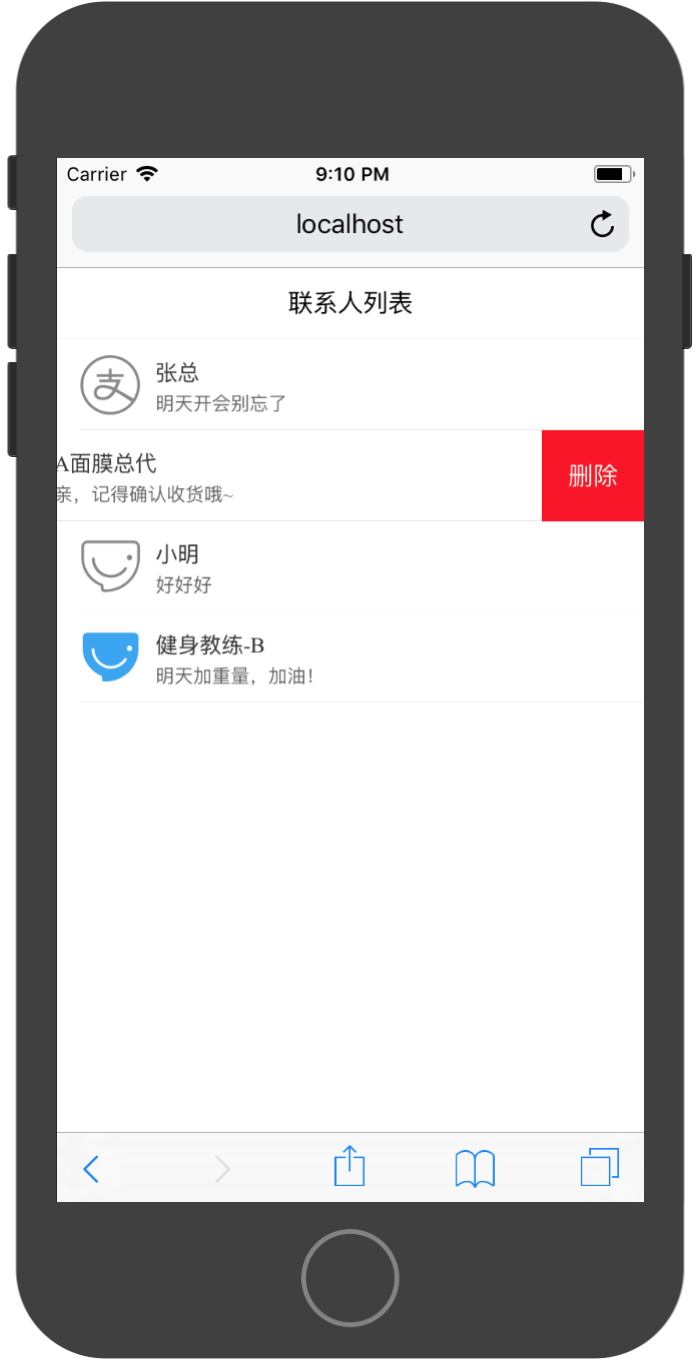
本节课程,我们使用一个联系人列表讲解Vue中组件化开发内容。
本节案例使用VantUI框架进行开发,Vant框架是有赞前端团队开源的Vue移动端组件库,提供标准的移动端组件体验。开发文档地址为:https://youzan.github.io/vant/#/zh-CN/intro
安装方法为:
npm i vant --save
在main.js文件中添加引入并注册组件库
import Vant from 'vant';
import 'vant/lib/vant-css/index.css';

Vue.use(Vant);
准备测试数据
列表中内容为通过网络请求获得,在静态页面构建过程中,先准备本地测试数据进行静态展示,测试数据格式与服务器返回格式一致。
const list = [
    {
        id:1,
        name:'张总',
        image:'https://zos.alipayobjects.com/rmsportal/sifuoDUQdAFKAVcFGROC.svg',
        lastMessage:'明天开会别忘了'
    },
    {
        id:2,
        name:'A面膜总代',
        image:'https://zos.alipayobjects.com/rmsportal/iSrlOTqrKddqbOmlvUfq.svg',
        lastMessage:'亲,记得确认收货哦~'
    }
]
在script中通过Vue实例构建数据对象:
<script>
export default {
  name: 'app',
  data:function(){
    return(
      {
        list:list
      }
    )
  }
}
</script
构建template
1,使用van-nav-bar和van-cell构建基础页面:
<template>
  <div id="app">
    <van-nav-bar
      fixed
      title="联系人列表"
    />
      <van-cell
        :title="Tom"
        :label='ok'
      >
      </van-cell>
  </div>
</template>
2,通过van-cell提供的iconslot自定义头像显示:
<img
    id='img'
    slot='icon'
    :src="1.png"
/>
头像图片显示样式:
#img{
  width: 38px;
  height: 38px;
  margin-right: 10px;
}
3,将头像显示标签通过slot放入van-call组件中:
<van-cell
    :title="Tom"
    :label='ok'
>
    <img
        id='img'
        slot='icon'
        :src="1.png"
    />
</van-cell>
4,使用v-for指令对多条数据进行批量渲染:
<van-cell
    v-for="(contact,index) in list"
    :key="contact.id"
    :title="contact.name"
    :label='contact.lastMessage'
>
    <img
        id='img'
        slot='icon'
        :src="contact.image"
    />
</van-cell>
5,通过van-cell-swipe组件为Cell添加滑动操作。
<van-cell-swipe
    :right-width="65"
    v-for="(contact,index) in list"
    :key="contact.id"
>
    <div
        id='delText'
        slot="right"
    >
        <span
            style="color:white"
        >删除</span>
    </div>
    <van-cell
        :title="contact.name"
        :label='contact.lastMessage'
    >
    <img
        id='img'
        slot='icon'
        :src="contact.image"
    />
    </van-cell>
</van-cell-swipe>
删除按钮的样式:
#delText{
  display: flex;
  justify-content: center;
  align-items: center;
  height: 58px;
  width: 65px;
  background-color: red;
}
在使用van-cell-swipe对van-cell进行包谷之后,需要将v-for指令提升到van-cell-swipe中进行。
添加页面事件
1,添加点击按钮删除的事件
在Vue例子中定义删除按钮的响应函数:
export default {
  name: 'app',
  components:{
    ContactCell,
  },
  data:function(){
    return(
      {
        list:[]
      }
    )
  },
  methods:{
    del:function(index){
      this.list.splice(index,1);
    }
  }
}
为删除按钮绑定该事件,并传入该Cell的索引值,索引值有v-for指令中获取
<div
    id='delText'
    slot="right"
    @click="del(index)"
>
    <span
        style="color:white"
    >删除</span>
</div>
2,添加声明周期方法:mounted
在该页面加载完成之后,需要通过网络从后台API请求当前页面的数据。
后台API接口为:http://localhost:4000/api/getContacts。
mounted:async function(){
    const res = await fetch('http://localhost:4000/api/getContacts');
    const list = await res.json();
    this.list = list;
}
完整实现代码
<template>
  <div id="app">
    <van-nav-bar
      fixed
      title="联系人列表"
    />
    <van-cell-swipe
      :right-width="65"
      v-for="(contact,index) in list"
      :key="contact.id"
    >
      <div
        id='delText'
        slot="right"
        @click="del"
      >
        <span
          style="color:white"
        >删除</span>
      </div>
      <van-cell
        :title="contact.name"
        :label='contact.lastMessage'
      >
        <img
          id='img'
          slot='icon'
          :src="contact.image"
        />
      </van-cell>
    </van-cell-swipe>
  </div>
</template>

<script>

export default {
  name: 'app',
  data:function(){
    return(
      {
        list:[]
      }
    )
  },
  methods:{
    del:function(index){
      this.list.splice(index,1);
    }
  },
  mounted:async function(){
    const res = await fetch('http://localhost:4000/api/getContacts');
    const list = await res.json();
    this.list = list;
  }
}
</script>

<style>
#app{
  padding-top: 46px;
}
.van-nav-bar{
  background-color: rgba(246, 246, 246, 1);
}

#img{
  width: 38px;
  height: 38px;
  margin-right: 10px;
}
#delText{
  display: flex;
  justify-content: center;
  align-items: center;
  height: 58px;
  width: 65px;
  background-color: red;
}
</style>
通过完整实现代码,我们发现,在App.vue的template中,过多的代码实现了Cell的细节构建过程,但这些构建过程可能会在其他组件中使用到。所以为了优化App中的代码和增强代码的复用能力,讲Cell的构建细节过程通过Vue组件进行封装。
构建ContactCell组件
1,定义props接口
ContactCell组件通过props属性接收外埠传入的数据并展示。在该组件的template中可以直接使用已经定义的props属性。
此组件在props中定义了一个contact属性,在外界将contact数据通过此属性进行传值。
<script>
export default {
  name:'ContactCell',
  props:[
      'contact',
  ]
}
</script>
2,在template构建Cell实现细节
<template>
  <van-cell-swipe
      :right-width="65"
    >
      <div
        id='delText'
        slot="right"
      >
        <span
          style="color:white"
        >删除</span>
      </div>
      <van-cell
        :title="contact.name"
        :label='contact.lastMessage'
      >
        <img
          id='img'
          slot='icon'
          :src="contact.image"
        />
      </van-cell>
    </van-cell-swipe>
</template>
添加样式:
<style>
#img{
  width: 38px;
  height: 38px;
  margin-right: 10px;
}
#delText{
  display: flex;
  justify-content: center;
  align-items: center;
  height: 58px;
  width: 65px;
  background-color: red;
}
</style>
3,添加组件内删除事件响应函数
在该事件响应函数内通过this.$emit()触发一个事件。该事件在组件外界可以通过v-on进行监听。
<script>
export default {
  name:'ContactCell',
  props:[
      'contact',
  ],
  methods:{
      del:function(){
          this.$emit('del');
      }
  }
}
</script>
在template中绑定事件处理函数
<div
    id='delText'
    slot="right"
    @click="del"
>
    <span
        style="color:white"
        @click="del"
    >删除</span>
</div>
完整实现代码:
<template>
  <van-cell-swipe
      :right-width="65"
    >
      <div
        id='delText'
        slot="right"
        @click="del"
      >
        <span
          style="color:white"
          @click="del"
        >删除</span>
      </div>
      <van-cell
        :title="contact.name"
        :label='contact.lastMessage'
      >
        <img
          id='img'
          slot='icon'
          :src="contact.image"
        />
      </van-cell>
    </van-cell-swipe>
</template>

<script>
export default {
  name:'ContactCell',
  props:[
      'contact',
  ],
  methods:{
      del:function(){
          this.$emit('del');
      }
  }
}
</script>


<style>
#img{
  width: 38px;
  height: 38px;
  margin-right: 10px;
}
#delText{
  display: flex;
  justify-content: center;
  align-items: center;
  height: 58px;
  width: 65px;
  background-color: red;
}
</style>
使用ContactCell组件重构App
1,引入ContactCell组件并进行局部注册
<script>

import ContactCell from './components/ContactCell.vue';

export default {
  name: 'app',
  components:{
    ContactCell,
  }
}
</script>
经过注册的组件便可以在template中使用该组件了。
2,在template中使用该组件重构代码
<template>
  <div id="app">
    <van-nav-bar
      fixed
      title="联系人列表"
    />
    <ContactCell
      v-for="(contact,index) in list"
      :key="contact.id"
      :contact="contact"
      @del="del(index)"
    />
  </div>
</template>
ContactCell组件将不应在App负责的Cell构建细节进行封装,从而使App的template代码根据清晰简洁。
完整实现代码:
<template>
  <div id="app">
    <van-nav-bar
      fixed
      title="联系人列表"
    />
    <ContactCell
      v-for="(contact,index) in list"
      :key="contact.id"
      :contact="contact"
      @del="del(index)"
    />
  </div>
</template>

<script>

import ContactCell from './components/ContactCell.vue';

export default {
  name: 'app',
  components:{
    ContactCell,
  },
  data:function(){
    return(
      {
        list:[]
      }
    )
  },
  methods:{
    del:function(index){
      this.list.splice(index,1);
    }
  },
  mounted:async function(){
    const res = await fetch('http://localhost:4000/api/getContacts');
    const list = await res.json();
    this.list = list;
  }
}
</script>

<style>
#app{
  padding-top: 46px;
}
.van-nav-bar{
  background-color: rgba(246, 246, 246, 1);
}

</style>