Ant长列表
在WebApp中,经常需要渲染一些条目未知的列表页面,例如微信通讯录、微博或淘宝商品类别。在渲染这些条目未知的且具有刷新和分页功能的列表时,需要使用ListView组件。
在渲染条目已知的类别页面时,推荐使用
List。
在使用ListView组件时需要完成以下步骤:
- 明确元数据结构
- 依照美工设计,构造渲染元数据的
Item组件 - 初始化
dataSource对象 - 使用
dataSource对象装载数据 - 构造
renderRow()函数,在该函数中负责使用Item组件渲染元数据
元数据
渲染长列表时,首先要确定被渲染的数据单元格式,然后依据数据单元格式构建渲染数据单元的Item组件。
构造测试数据:
const data = [
    {
        id:1,
        name:'张三',
        tel:'18600000001'
    },
    {
        id:1,
        name:'李四',
        tel:'18600000001'
    },
    {
        id:1,
        name:'王五',
        tel:'18600000001'
    },
]
其数组中的每一个对象即为元数据:
{
    id:1,
    name:'王五',
    tel:'18600000001'
}
一组元数据应具有相同的数据结构,即键名一致。
Item组件
通过对元数据分析,构造展示元数据的Item组件。Item组件的功能就是安装设计要求渲染元数据中的字段。
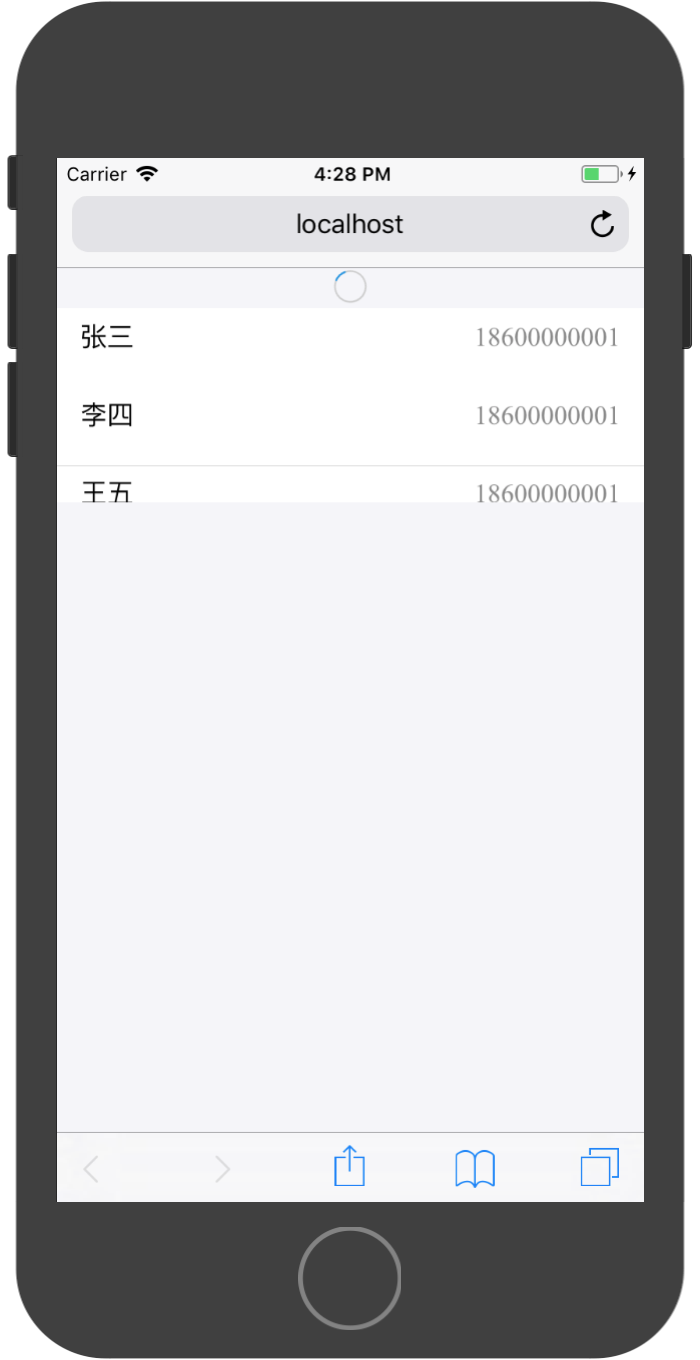
例如我们构造一个非常简单的Item组件,其渲染效果为:

实现代码为:
import React, { Component } from 'react'

import {Card} from 'antd-mobile';

import './Item.css';

export default class Item extends Component {

  render() {
    return (
      <Card full={true}>
        <Card.Header
          title={this.props.name}
          extra={this.props.tel}
        />
      </Card>
    )
  }
}
样式调整代码为:
.am-card {
    min-height: 40px;
}
在Item组件的实现过程中,可以通过其this.props属性直接使用元数据中的字段内容。我们会在renderRow()函数中确保将这些数据传入组件内部。
数据源 DataSource
在使用ListView之前,还需要通过ListView.DataSource对数据进行处理。因ListView经常会有部分数据需要变化和刷新,ListView.DataSource对象主要功能为判定数据是否发生变化,然后通知ListView只对变化的部分进行刷新,从而对渲染效率进行优化,避免每次因一个数据变化而全部数据都需要刷新的情况。
ListView.DataSource需要在constructor()函数中进行初始化操作,在初始化的时候需要配置一个数据判定规则rowHasChanged默认为(row1, row2) => row1 !== row2,表示两个对象不相等即更新该条目数据。
数据源对象初始化代码:
  constructor(props) {
    super(props)

    const dataSource = new ListView.DataSource({
      rowHasChanged: (row1, row2) => row1 !== row2
    });

    this.state = {
      dataSource
    }
  }
在数据发送变化时,通过调用其cloneWithRows()更新数据,此时ListView.DataSource会将新旧数据进行对比,然后通知ListView更新相应的数据。一般我们在componentDidMount()中从API请数据,然后在将请求结果通过cloneWithRows()方法将数据进行更新:
async componentDidMount(){
    const res = await fetch('http://localhost:5000/api/allUsers');
    const result = await res.json();

    this.setState((preState)=>{
      return{
        dataSource:preState.dataSource.cloneWithRows(result.data)
      }
    })

}
ListView基本使用
ListView基本使用方法需要配置两个属性:
dataSourcerenderRow
renderRow的类型是一个回调函数,其携带一个参数,参数中为一个元数据。我们需要在方法中返回对该数据渲染的元素。使用之前构建的Item组件对该元数据进行渲染。ListView会根据当前屏幕的可视区域变化来决定哪些元数据需要渲染,所以该函数会不定时的执行多次。
renderRow = (user)=>{
    return <Item {...user} />
}
完整代码:
import React, { Component } from 'react';
import ReactDOM from 'react-dom';

import {ListView} from 'antd-mobile';

import Item from './Item';


export default class App extends Component {

  constructor(props) {
    super(props)

    const dataSource = new ListView.DataSource({
      rowHasChanged: (row1, row2) => row1 !== row2
    });

    this.state = {
      dataSource,
    }
  }

  async componentDidMount(){
    const res = await fetch('http://localhost:5000/api/allUsers');
    const result = await res.json();

    this.setState((preState)=>{
      return{
        dataSource:preState.dataSource.cloneWithRows(result.data),
      }
    })

  }

  renderRow = (user)=>{
    return <Item {...user} />
  }


  render() {

    return (
        <div>
          <ListView
            useBodyScroll={true}
            dataSource={this.state.dataSource}
            renderRow={this.renderRow}
          />
        </div>
    );
  }
}
在使用ListView时需要注意一点,因为ListView可以滚动,其滚动区域有两种选择:
- 整个承载
ListView的页面一起滚动 - 页面中定义单独的滚动区域,其他区域不做滚动
我们在这个案例中选择整个页面一起滚动,所以需要添加useBodyScroll={true}的属性,如这个属性没有添加且没有定义固定的滚动区域,则列表中的内容将不会显示。
下拉刷新
在WebApp中,通常使用下拉的方式对数据进行更新操作。AntDesign提供了PullToRefresh组件提供下拉刷新的功能支持。
其API为:
| 属性 | 说明 | 类型 | 默认值 | |
|---|---|---|---|---|
| direction | 拉动方向,可以是 up 或 down | String | down | |
| distanceToRefresh | 刷新距离 | number | 25 | |
| refreshing | 是否显示刷新状态 | bool | false | |
| onRefresh | 必选, 刷新回调函数 | () => void | - | |
| indicator | 指示器配置 | { activate: ReactNode, deactivate: ReactNode, release: ReactNode, finish: ReactNode } | Object | - |
| damping | 拉动距离限制, 建议小于 200 | number | 100 |
PullToRefresh提供了一个默认的展示外观,我们只需配置其refreshing和onRefresh即可快速使用。
refreshing指示其当前是否再刷新状态,且在状态切换过程中该组件会提供过渡动画,我们只需根据实际情况配置其值即可。
onRefresh是当下拉刷新开始时的回调函数,在该回调函数内进行刷新操作,并维护refreshing状态。
实现代码为:
import React, { Component } from 'react';
import ReactDOM from 'react-dom';

import {ListView,PullToRefresh,WhiteSpace} from 'antd-mobile';

import Item from './Item';


export default class App extends Component {

  constructor(props) {
    super(props)

    const dataSource = new ListView.DataSource({
      rowHasChanged: (row1, row2) => row1 !== row2
    });

    this.state = {
      dataSource,
      refreshing:false,
    }
  }

  async componentDidMount(){
    const res = await fetch('http://localhost:5000/api/allUsers');
    const result = await res.json();
    console.log(result)

    this.setState((preState)=>{
      return{
        dataSource:preState.dataSource.cloneWithRows(result.data),
      }
    })

  }


  renderRow = (user)=>{
    return <Item {...user} />
  }

  onRefresh = async ()=>{
    this.setState({
      refreshing:true
    })

    const res = await fetch('http://localhost:5000/api/allUsers');
    const result = await res.json();

    this.setState((preState)=>{
      return{
        refreshing:false,
        dataSource:preState.dataSource.cloneWithRows(result.data),
      }
    })
  }

  render() {

    return (
        <div>
          <ListView
            useBodyScroll={true}
            dataSource={this.state.dataSource}
            renderRow={this.renderRow}
            pullToRefresh={(
              <PullToRefresh
                refreshing={this.state.refreshing}
                onRefresh={this.onRefresh}
              />
            )}
          />
        </div>
    );
  }
}
底部加载
在列表展示数据时,通过会使用分页技术将多条数据分页进行展示。在移动WebApp中,用户通常将列表拉到最下端时,App会自动加载下一页的数据。
在ListView组件中,可以通过配置onEndReachedThreshold和onEndReached两个属性实现此功能。
onEndReachedThreshold为调用onEndReached之前的临界值,单位是像素onEndReached的触发条件为:当所有的数据都已经渲染过,并且列表被滚动到距离最底部不足onEndReachedThreshold个像素的距离时
同时,为了防止onEndReached在加载数据过程中在次被触发,需要手动维护一个加载状态。
实现参考代码:
import React, { Component } from 'react';
import ReactDOM from 'react-dom';

import {ListView,PullToRefresh,WhiteSpace} from 'antd-mobile';

import Item from './Item';


export default class App extends Component {

  constructor(props) {
    super(props)

    const dataSource = new ListView.DataSource({
      rowHasChanged: (row1, row2) => row1 !== row2
    });

    this.state = {
      dataSource,
      refreshing:false,
      isLoading:false,
    }
  }

  async componentDidMount(){
    const res = await fetch('http://192.168.31.170:5000/api/allUsers');
    const result = await res.json();
    console.log(result)

    this.setState((preState)=>{
      return{
        dataSource:preState.dataSource.cloneWithRows(result.data),
      }
    })

  }


  renderRow = (user)=>{
    return <Item {...user} />
  }

  onRefresh = async ()=>{
    this.setState({
      refreshing:true
    })

    const res = await fetch('http://localhost:5000/api/allUsers');
    const result = await res.json();

    this.setState((preState)=>{
      return{
        refreshing:false,
        dataSource:preState.dataSource.cloneWithRows(result.data),
      }
    })
  }

  onEndReached = ()=>{

    if(this.state.isLoading){
      return;
    }
    this.setState({
      isLoading:true
    })

    setTimeout(()=>{
      this.setState({
        isLoading:false
      })
    },3000)
  }


  render() {

    return (
        <div>
          <ListView
            initialListSize={18}
            useBodyScroll={true}
            dataSource={this.state.dataSource}
            renderRow={this.renderRow}
            pullToRefresh={(
              <PullToRefresh
                refreshing={this.state.refreshing}
                onRefresh={this.onRefresh}
              />
            )}
            renderFooter={()=>{
              return (
                <div style={{ padding: 30, textAlign: 'center' }}>
                  {this.state.isLoading ? 'Loading...' : 'Loaded'}
                </div>
              )
            }}
            onEndReached={this.onEndReached}
            onEndReachedThreshold={50}
          />
        </div>
    );
  }
}
代码中的onEndReached响应函数中并没有做真实的数据加载操作,因数据加载操作需要API支持,同时需要数据管理,真实的操作在后续章节中设计,这里仅对事件进行讲解。
Item滑动按钮
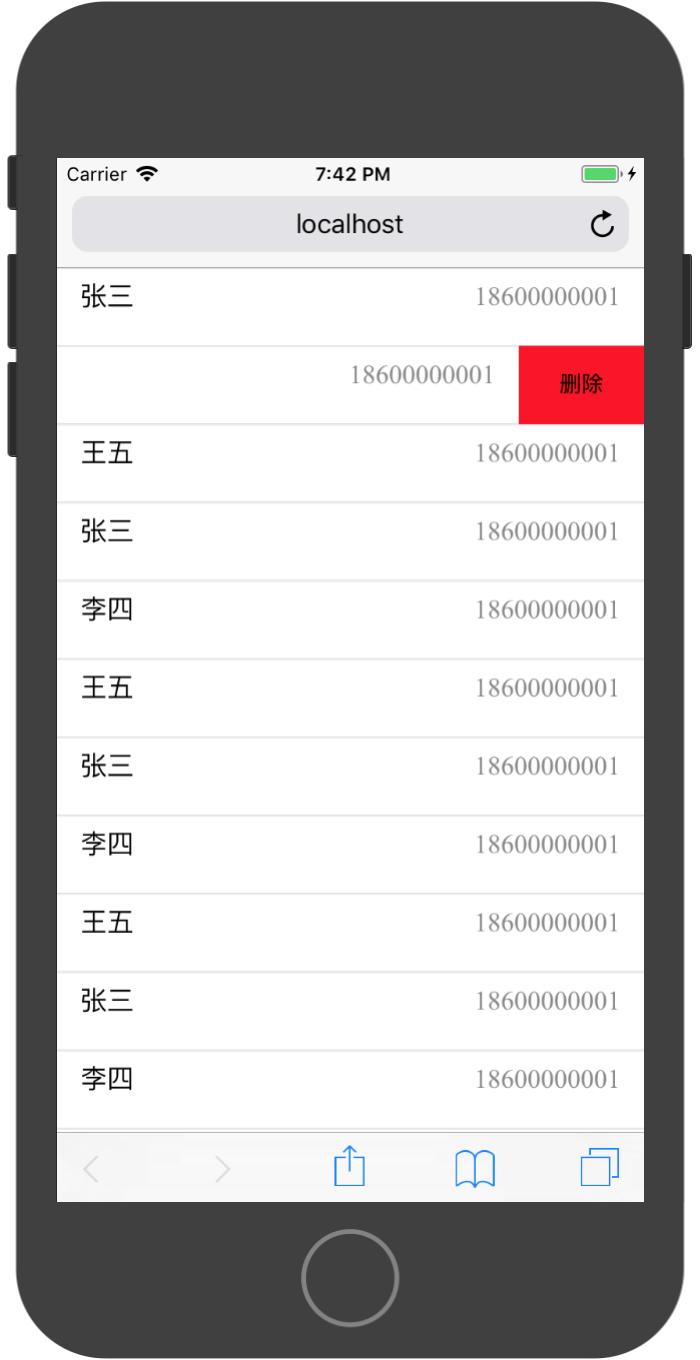
在列表操作中,Item可以滑动添加操作,通过使用SwipeAction组件实现此功能。
实训代码:
import React, { Component } from 'react'

import {Card,SwipeAction} from 'antd-mobile';

import './Item.css';

export default class Item extends Component {

  render() {
    return (
      <SwipeAction
        right={[
          {
            text:'删除',
            style:{
              backgroundColor:'red',
              width:'80px'
            },
            onPress:()=>{
              console.log('删除')
            }
          }
        ]}
        autoClose
      >
        <Card full={true}>
          <Card.Header
            title={this.props.name}
            extra={this.props.tel}
          />
        </Card>
      </SwipeAction>
    )
  }
}